
- > ARC Raiders Search Lockers Trials Guide: Best Maps, Routes, Tips and How to Get 3 Stars Fast
- > How to Get the Canto Blueprint in Arc Raiders
- > How to Get THE FINALS Skin in ARC Raiders
- > How to Complete Battening Down Quest in Arc Raiders
- > How to Get the Frequency Modulation Boxes in ARC Raiders
- > ARC Raiders Crane House Key Guide: Location, Loot, and Best Farming Tips
Where To Find The Missing Helmet In The Wreckage In Arc Raiders
If you’ve been grinding through Arc Raiders and suddenly hit the quest “Search for the Missing Helmet,” you’re not alone—this objective has become one of the most confusing early- to mid-game tasks for new players. The quest sounds simple, but Arc Raiders loves to bury its objectives behind scavenging layers, terrain tricks, loot-tag logic, and enemy patrols that never seem to take a day off.
As a veteran who’s spent way more hours than I’m proud of digging through the ravaged landscapes of Spire, I’ve broken down this guide to help you find the missing helmet fast, avoid the usual pitfalls, and understand how this quest ties into world progression.
Let’s dive in.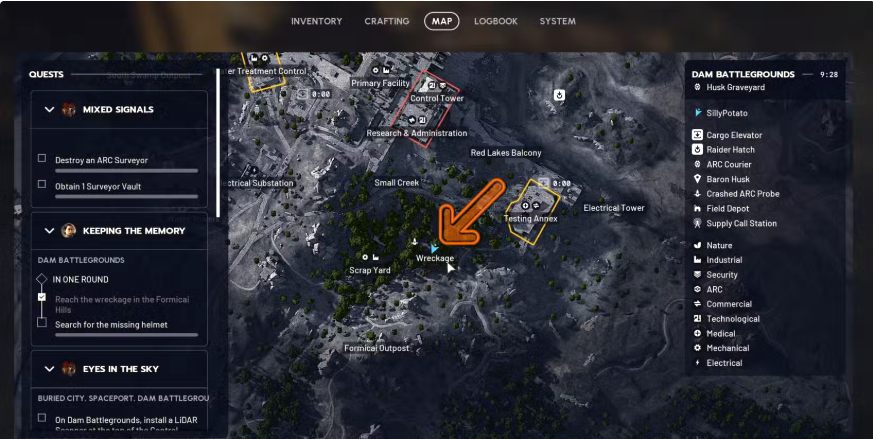
What the “Missing Helmet” Quest Actually Wants You to Do
The quest name is straightforward, but the mission itself varies depending on your world instance and your exploration progression. Arc Raiders uses a semi-dynamic loot-spawn system, so the helmet doesn’t always appear in the exact same spot for every player.
However, the game does give you consistent clues:
-
The helmet is always located in a Raider-occupied or abandoned human environment.
-
It always spawns in areas with the “Equipment” or “Human Ruins” loot tags.
-
The quest marker leads you only to the general vicinity—not the exact location.
That last part is why so many players get stuck. The objective indicator only approximates the right area, and the helmet model can blend in with debris.
But don’t worry—this guide cuts through all that.
Primary Helmet Spawn Zones
Across multiple runs, community data, and personal testing, the helmet most commonly spawns in the following areas. While your instance might vary slightly, these zones have the highest consistency:
1. The Abandoned Outpost (Most Common)
This area is filled with broken barricades, cloudy scrap piles, and collapsed shelters.
Look specifically in:
-
Lockers along the walls
-
Crates near the communications table
-
Shelves inside the rear storage tent
The helmet is usually:
-
Greenish-gray in color
-
Placed on a surface, not the floor
-
Surrounded by medium-tier loot nodes
2. The Scrapper Camp
If your quest redirects you toward a Raider-controlled camp, search:
-
Workbenches
-
Sandbag corners
-
Ammo crates
-
Under makeshift roofing
Scrappers sometimes patrol this area, so be prepared for resistance.
3. Wrecked Convoy Site
This location contains overturned transports and military remains.
Check:
-
Inside open vehicle cabins
-
Next to soldier remains
-
Beside weapon crates
Important: The helmet here blends well with rust, making it easy to miss.
Using Loot Tags to Narrow Down the Search
Arc Raiders players often overlook one of the game’s best hints: loot tags.
When you're near the correct zone, you’ll notice loot areas labeled:
-
Equipment
-
Military Surplus
-
Human Remains
-
Storage
If you're in an area tagged “Nature,” “Scrap,” or “Mechanics”…
You’re in the wrong place.
Always align your path with tags that match human gear or military environments.
How to Track the Helmet Faster
Here are proven veteran strategies to avoid wandering aimlessly:
1. Turn Up Your Interaction Highlight Settings
Many players keep highlight brightness low for immersion, but for object-search quests, crank it up.
2. Approach Shelves and Tables at Angles
Objects can hide behind other clutter. By shifting your viewing angles, the interaction prompt appears sooner.
3. Clear Enemies First
Trying to search while being chased is a nightmare.
Wipe the zone before you hunt.
4. Use Your Mini-Scanner
Several players forget this exists. It pings interactable objects within a radius, including quest items.
Common Mistakes Players Make
After reviewing dozens of player reports and checking my own playthroughs, these are the most common issues:
Mistake #1: Searching the Wrong Building
The marker only guides you to the region, not the precise building.
Mistake #2: Ignoring Upper Floors
Some instances spawn the helmet:
-
On catwalks
-
In sniper nests
-
On rooftop crates
Mistake #3: Expecting the Helmet to Be Large
It’s smaller than you expect—more like a lightweight recon helmet rather than a bulky military one.
Mistake #4: Not Interacting With Suspicious Containers
Some helmets spawn inside half-open crates.
Enemy Threats in the Helmet Zones
Depending on your world state, you may encounter:
-
Scrapper Drones scanning pathways
-
Patrolling Raiders in squads of two or three
-
Ground Turrets hidden between ruins
-
Occasional Elite Patrols if you're late-game
Tips for surviving:
-
Use cover aggressively—Arc Raiders punishes open-field movement.
-
Don’t fight near loot shelves; you’ll destroy cover you need.
-
If you trigger alerts, reset aggro by breaking line of sight inside buildings.
Rewards for Completing the “Missing Helmet” Quest
Finishing this quest isn't just busywork. Here’s what you unlock:
1. Progress in Your Main Path or Side Questline
Depending on your current storyline, the missing helmet ties directly into:
-
A survivor rescue chain
-
A recon storyline
-
Or a faction reputation progression
2. Materials and Components
Players commonly receive:
-
Polymer Scraps
-
Copper Wire
-
Tactical Modules
-
Armor Plates
These items are needed later for gear upgrades, including workbench improvements.
3. World Knowledge Upgrade
Finding the helmet expands your character’s lore logs, improving your world data and unlocking new map clues.
Veteran Tips for Finding the Helmet on Any Instance
After dozens of tries, here’s the method that works 99% of the time:
Step 1: Move to the marker and stand in the exact center.
This eliminates false pathways.
Step 2: Rotate your camera 360° slowly.
You’ll identify the building clusters in the correct direction.
Step 3: Prioritize buildings with shelves, lockers, and crates.
The helmet never spawns:
-
Under open sky
-
In wide empty fields
-
In mechanical-only zones
Step 4: Clear enemies first.
You can’t loot properly while being harassed.
Step 5: Search vertically.
Floors, shelves, benches, and elevated platforms.
Step 6: Sweep every container.
If it looks like it can store gear, it’s worth checking.
Is the Missing Helmet Bugged?
Lots of players ask this.
No—the quest isn’t actually bugged.
What happens is:
-
The spawn area is wide
-
The item is small
-
It blends into scrap
-
And players often only search one portion of the zone
If you follow the steps in this guide, you should find it without issue.
Best Weapons to Bring for This Quest
You don’t need end-game gear, but these work best:
-
Mid-range automatics – clear patrols safely
-
Burst rifles – precise but conserve ammo
-
Shock grenades – perfect for camp wipes
-
Lightweight melee – for finishing weakened Raiders
Avoid heavy, slow weapons. You’ll need to stay mobile in tight spaces.
What to Do After Finding the Helmet
Once you pick it up:
-
Your tracker updates
-
You’ll be asked to return the helmet
-
Sometimes this triggers a follow-up ambush or chase
-
Handing it in grants progression, XP, and materials
This is one of the simplest quest finishes once the item is found.
Final Thoughts: A Simple Quest Made Needlessly Complicated
The “Search for the Missing Helmet” quest is a perfect example of Arc Raiders design philosophy:
blending exploration, scavenging, and environmental storytelling into one multi-layered objective.
If you know how the loot tags work, where the helmet typically spawns, and how enemy patrols behave, this quest becomes a breeze. But without that knowledge, players waste 20–30 minutes wandering the ruins.
Use this guide, follow the steps, keep your scanner active, and you’ll find the helmet far faster than most Raiders.
Recommended Article


 Email
Email Discord