
- > ARC Raiders Search Lockers Trials Guide: Best Maps, Routes, Tips and How to Get 3 Stars Fast
- > How to Get the Canto Blueprint in Arc Raiders
- > How to Get THE FINALS Skin in ARC Raiders
- > How to Complete Battening Down Quest in Arc Raiders
- > How to Get the Frequency Modulation Boxes in ARC Raiders
- > ARC Raiders Crane House Key Guide: Location, Loot, and Best Farming Tips
Arc Raiders A Dead End Quest Walkthrough Guide
If you’ve been grinding your way through Arc Raiders and just picked up the A Dead End quest, you’ve probably already realized one thing this mission can get confusing fast. It throws you into underground exploration, forces you to solve a mini objective puzzle, and then expects you to extract safely with a key item. One mistake, and you’re back to square one.
I’ve run this quest multiple times, both solo and in squads, and yeah it can feel messy the first time. But once you understand the flow, it becomes one of those missions you can clear quickly and even farm efficiently.
This guide breaks everything down step by step in a clean, practical way so you can finish Arc Raiders A Dead End quest walkthrough without wasting time or losing progress.
Arc Raiders A Dead End Quest Overview
Before diving in, here’s a quick look at what you need to do in a single run:
-
Find Mantikor’s underground facilities
-
Enter the Security Wing
-
Open the locked room using batteries
-
Search for Project Heartwood records
-
Find the Dusty Film Reel
-
Extract and deliver it to Shani
Simple on paper. Not so simple when enemies, players, and RNG are involved.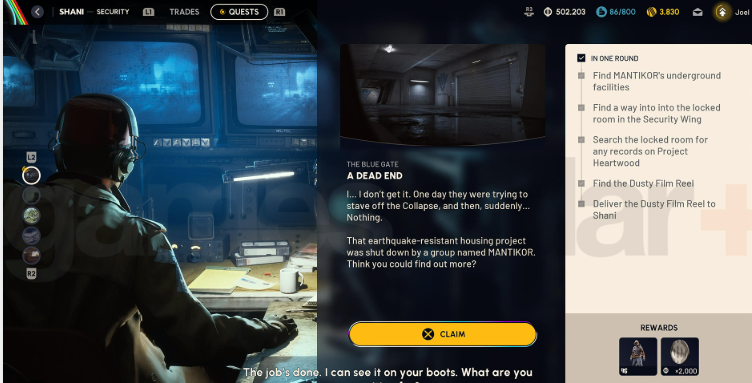
Step 1: Find Mantikor’s Underground Facilities
Your first objective is to locate Mantikor’s underground facility on the Blue Gate map.
Where to go
Head toward the central area of the map, specifically the Reinforced Reception or nearby structures. The easiest entry point is:
-
A small building with a zipline going downward
-
Alternatively, you can enter through checkpoints or the headhouse
Pro tip from experience
Take the zipline route whenever possible. It’s faster, more direct, and reduces your exposure on the surface where PvP is more common.
Once you descend and see the Mantikor branding and underground layout, you’re in the right place.
Step 2: Reach the Security Wing
After entering the underground facility, your next job is finding the Security Wing.
How to navigate
-
Follow the blue line on the floor
-
It will lead you through corridors and tunnels
-
Eventually, you’ll reach a large locked door
This is the key location for progressing the quest.
Step 3: Open the Locked Room with Batteries
Here’s where most players get stuck during the Arc Raiders A Dead End quest walkthrough.
What you need to do
To open the door, you must:
-
Find three battery cells
-
Bring them back to the console next to the locked door
-
Insert all three to unlock access
Battery spawn locations
From multiple runs, the batteries usually spawn in one of these spots:
Location 1
-
Upstairs area from the lobby
-
Near a circular passage with a large pipe overhead
Location 2
-
Lower level room
-
Near filing cabinets and storage areas
Important detail
All three batteries are always grouped together. You won’t need to search the entire map, just the Security Wing area.
Solo vs group strategy
-
Solo players: Move quickly and stay alert. Carry one battery at a time and avoid unnecessary fights
-
Squads: Split up and transport batteries faster
Also, don’t be surprised if you arrive and the door is already open. Other players might have done the work for you.
Step 4: Search for Project Heartwood Records
Once inside the locked room, you’re entering a high value loot area. But stay focused, the mission comes first.
What to do inside
-
Head to the back right side of the room
-
Look for a machine near a large screen
-
Interact with the Play Recording prompt
This progresses the objective and unlocks the next step.
Step 5: Find the Dusty Film Reel
Now comes the most important item in the entire quest.
Where to find it
-
Move to the left side of the big screen
-
Look for a searchable container or cabinet
-
Inside, you’ll find the Dusty Film Reel
Common mistake
A lot of players forget to actually pick it up after opening the container. Make sure you interact again to secure it in your inventory.
Step 6: Extract Safely with the Film Reel
This is where many runs fail.
You’ve done all the work, but if you die before extracting, you lose the item and have to redo everything.
Best extraction strategy
-
Immediately place the Dusty Film Reel in your safe pocket
-
Plan your exit route before leaving the room
-
Avoid unnecessary fights on the way out
Veteran tip
If you hear heavy combat or suspect players nearby, wait it out. Rushing extraction blindly is one of the biggest causes of failure in this quest.
Deliver the Item to Shani
Once you successfully extract:
-
Return to Speranza
-
Turn in the Dusty Film Reel to Shani
-
Enjoy your rewards and progression
Mission complete.
Advanced Tips for A Dead End Quest
After running this quest multiple times, here are some real-world tips that will save you time and frustration.
1. Always bring a safe pocket augment
This is non-negotiable.
Even if you die, your quest item stays safe, which means you don’t lose progress. It’s the difference between finishing in one run or repeating the entire mission.
2. Expect player traffic
The Security Wing is a hotspot during this quest.
You’ll often encounter:
-
Players doing the same mission
-
Loot hunters
-
PvP-focused raiders
Stay aware and don’t tunnel vision the objective.
3. Don’t overloot inside the room
Yes, the locked room has great loot.
But remember your priority:
-
Get the film reel
-
Get out
Greed is what gets most players killed here.
4. Play smart with random teammates
Sometimes you’ll run into other players doing the same objective.
You have two options:
-
Fight and risk everything
-
Cooperate briefly and finish faster
In many cases, a temporary truce makes the quest much easier.
5. Learn the map layout
The more familiar you are with Blue Gate, the faster this quest becomes.
Key areas to memorize:
-
Zipline entrance
-
Security Wing routes
-
Extraction points
Map knowledge is what separates smooth runs from chaotic ones.
Why This Quest Feels Difficult
The Arc Raiders A Dead End quest stands out because it combines multiple mechanics:
-
Exploration
-
Item collection
-
Puzzle solving
-
Extraction survival
It’s not just about knowing what to do, but executing it under pressure.
That’s why so many players struggle on their first attempt.
Rewards and Progression Value
Completing this quest isn’t just about ticking a box.
You get:
-
Story progression tied to Mantikor and Project Heartwood
-
Valuable loot from the locked room
-
Experience toward your character progression
If you’re planning to push deeper into Arc Raiders, this quest is a key milestone.
Final Thoughts
The Arc Raiders A Dead End quest walkthrough might seem overwhelming at first, but once you understand the structure, it becomes a smooth and repeatable run.
The key takeaways are simple:
-
Use the zipline to reach the underground quickly
-
Find all three batteries efficiently
-
Focus on the objective inside the locked room
-
Secure the Dusty Film Reel and extract safely
Play it smart, don’t rush, and always plan your exit.
If you’re looking to gear up faster or improve your chances in tougher runs, having solid Arc Raiders items can make a noticeable difference, and platforms like G4mmo are often mentioned by players in the community.
At the end of the day, this quest is a great example of what Arc Raiders does best blending tension, teamwork, and tactical decision-making into a single mission.
Good luck out there, Raider.
Recommended Article


 Email
Email Discord